

A Guide to Properly Spring Clean Your Shutters
Spring has a way of making everything feel a little more noticeable.
The brighter mornings, longer days and extra sunlight have a habit of exposing all the bits of the home we happily ignored through winter. Dust on the shelves suddenly stands out, smudges on the glass become impossible to miss, and shutters that looked perfectly fine in January can start looking a little tired by March.
The good news is that spring cleaning your shutters is not nearly as difficult as it sounds. In fact, once you know what to do, it can become one of the most satisfying jobs in the house.
Clean shutters do not just look better either. They help rooms feel fresher, allow more natural light to bounce around properly, and can even help your whole space look more polished without needing to redecorate.
If you have been wondering how to clean your shutters without damaging them, or you have been putting it off because it feels like a fiddly job, this guide will walk you through it in a simple and realistic way.
Why Shutters Need a Proper Spring Clean
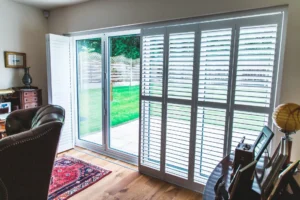
Shutters do a brilliant job all year round. They give you privacy, help control light, and add a neat, timeless look to a room. But because they sit right by windows, they naturally collect dust, pollen, cooking residue, moisture and the everyday grime that builds up slowly over time.
During winter, homes are often closed up more tightly, which can mean dust settles more heavily indoors. Then spring arrives, windows get opened again, more air starts flowing through the house, and shutters can quickly become a magnet for fresh dust and pollen.
If they are in kitchens or bathrooms, they may also be dealing with grease or humidity on top of that.
That is why spring is the perfect time to give them a bit of attention. It is not just about appearances. A proper clean helps keep shutters in good condition and makes it easier to spot any little issues before they become bigger ones.
Start by Knowing What Your Shutters Are Made From
Before diving in with sprays and cloths, it helps to know what kind of shutters you are dealing with. Most interior shutters are made from either real wood, MDF with a painted finish, or a waterproof material designed for bathrooms and kitchens.
This matters because not all shutters should be treated in exactly the same way. Solid wood shutters tend to need a gentler touch and less moisture. Waterproof shutters are usually more forgiving and easier to wipe down. Painted finishes also need a bit of care so that strong chemicals or too much scrubbing do not dull the surface.
You do not need to overcomplicate it, but it is worth keeping one basic rule in mind: when cleaning shutters, less water is usually better. You want them clean, not soaked.

Gather the Right Cleaning Bits First
One of the easiest ways to make the job feel annoying is to start and then realise you are missing half the things you need. The good news is that shutter cleaning does not require anything fancy.
A microfibre cloth is probably your best friend here. It lifts dust well and is soft enough not to scratch the finish. A soft brush attachment on a vacuum cleaner can also be useful for a quick first pass, especially if the shutters are particularly dusty.
For the actual cleaning, a bowl of warm water with a tiny amount of mild soap is usually enough. Cotton buds or a soft toothbrush can help with tighter corners if needed, and a dry lint-free cloth is ideal for finishing.
This is definitely not a job for harsh sprays, rough scrubbers or anything heavily chemical-based. If a product feels like it belongs in a garage rather than a living room, it is probably not the one to use on your shutters.
Dust First, Clean Second
It is tempting to jump straight in with a damp cloth, but that often just smears dust around and turns it into a bit of a mess. Start dry.
Open the shutter panels fully so you can access all sides properly. Then angle the louvres so you can get between them more easily. Use a dry microfibre cloth, feather duster or vacuum with a soft brush attachment to remove loose dust from top to bottom. Starting at the top makes sense because dust will naturally fall downward as you work.
Do not forget the frame around the shutters, as well as the hinges and corners where dust loves to gather quietly. These are the areas people often miss, but they can make a surprising difference once cleaned.
This stage alone can already make shutters look fresher, so if yours are only lightly dusty, you may find that a dry clean is enough for now.
How to Wipe Down Shutters Properly
Once the dust is gone, you can move on to wiping the shutters down. Dip your cloth into warm, lightly soapy water, then wring it out really well. The cloth should be damp, not wet.
Wipe each louvre gently, following the length of it rather than scrubbing across it. This helps lift marks without being too rough on the finish. Then move on to the stiles, frames and any other flat surfaces.
If you come across slightly stubborn spots, use a little more patience rather than more force.
One of the easiest mistakes to make is using too much water, especially around joints or hinges. Moisture should never be dripping into the structure of the shutter. If you are cleaning wooden shutters, be even more cautious and dry each section soon after wiping it.
It can feel a bit repetitive, but it is one of those jobs where steady and gentle really does win.
Tackling Kitchen and Bathroom Shutters
Shutters in kitchens and bathrooms tend to have a tougher life than the ones in bedrooms or lounges.
In kitchens, grease can settle slowly over time, especially if the shutters are near a hob or cooking area. In bathrooms, steam and condensation can leave behind a dull residue if they are not wiped down every so often.
For kitchen shutters, a mild soap solution is often enough, but you may need to go over certain areas twice. The key is not to reach for aggressive degreasers straight away. Start gently and build only if needed.
For bathroom shutters, a simple wipe-down followed by proper drying usually works well. If you notice any build-up around corners or edges, a soft toothbrush can help loosen it without damaging the finish.
Waterproof shutters are especially practical in these spaces for exactly this reason. They are designed to cope better with moisture and are generally easier to maintain.
Do Not Forget the Details
When people think of cleaning shutters, they usually focus on the louvres and front panels, but the small details matter too. Hinges, magnets, catches and corners can all collect dust and grime over time.
Use a dry cloth or cotton bud to gently clean these areas. If the hinges look dusty, a careful wipe is usually enough. There is no need to overdo it with oils or sprays unless there is a genuine issue with movement.
In most cases, a good clean solves the feeling that shutters are stiff or slightly gritty.
It is also worth checking that everything still lines up properly while you are there. If a panel feels loose or a louvre is not moving as smoothly as it should, spring cleaning is a great moment to notice it.
Common Cleaning Mistakes to Avoid
A lot of shutter cleaning problems come from trying too hard rather than not trying enough. Using too much water is probably the biggest one. It might seem harmless, but too much moisture can cause trouble over time, especially with wooden finishes.
Another common mistake is using strong chemical products to chase a quick result. These can damage paint, dull the finish or leave behind residue that attracts even more dust later on.
Rough cloths and abrasive sponges are also best avoided, as they can mark the surface without you noticing straight away.
Then there is the classic mistake of only cleaning the obvious front-facing sections. If you do not clean the edges, frame and back sections too, shutters can still look dusty as soon as the light hits them from a different angle.
How to Keep Shutters Looking Fresh After Spring
Once your shutters are properly cleaned, keeping them looking good is much easier than doing a deep clean from scratch every time.
A quick dust every week or two can stop build-up from becoming a bigger job later. Even running a microfibre cloth over them as part of your usual room tidy can make a big difference.
If you can, open windows occasionally to let rooms air out, especially after cooking or showering. This helps reduce the moisture and residue that can settle on surfaces. In kitchens and bathrooms, a more regular wipe-down will usually keep things under control.
The nice thing about shutters is that they are fairly low-maintenance when you stay on top of them. They do not ask for much, but they definitely reward a bit of regular care.

A Small Job That Makes a Big Difference
Spring cleaning your shutters might not sound like the most exciting task in the world, but it is one of those little jobs that genuinely lifts a room.
Clean shutters let the light in better, look sharper, and help the whole space feel more put together. It is a subtle change, but one that can make your home feel fresher almost instantly.
The best part is that you do not need specialist products, loads of time or a grand plan. Just a bit of gentle cleaning, some attention to detail and a sensible approach goes a long way.
So if your shutters have been quietly collecting dust all winter, now is the perfect time to give them the refresh they deserve. Once they are done, you will probably wonder why you did not tackle them sooner.
Should you have any questions or would like any more information regarding our ranges of shutters, then please do not hesitate to contact the Fraser James Blinds team. We also have various ranges of blinds, awnings and bespoke furniture. Alternatively, you can also arrange a home visit at a time that works best for you.
You may also be interested in...


A Fresh Start: Spring Cleaning Tips for Blinds and Shutters
Read More
Are All Shutter Styles the Same? Exploring the Subtle Differences That Define Window Shutters
Read More
Are Shutters a Good Investment?
Read More
A Comprehensive Guide to Maintaining Your Investments in Blinds and Shutters
Read More